
How to add in custom 3D parts in your car/trucks.
Tools to be used in tutorial:
- 3D modeling software: Zanoza 3D ver 1.05. >> http://www.zmodeler.com
- Texture surface design: Corel Photo Paint 9.0 and Adobe Photoshop
- File packaging/zipping: PODTOOL or Winpod
- Texture converter to *.RAW format: FLYRAWGUI
Putting custom made parts into your car/truck using Z-modeler If you've downloaded custom made parts, you'll need to add them using "Z-Modeler" 3d program. Parts usually need to be installed onto your car/trucks manually. Add-in parts is similar to "assemble your self a plastic model kit car/trucks", except you don't need glue in this scenario but the only tools you needed is 3d software utility: Z-modeler. Before proceed make sure you get your stuff ready, all program and files should be available in proper place, look own for some check list:
- Z-modeler program (configure your Z-modeler graphic setup to "RGB emulation" how? click here)
- Get your favorite car/truck (*.POD file) that you want to modify, unpod your *.POD files using WInPOD.exe or PODTOOL.exe. Three folder will be displayed once you pod it right as shown below
- [ART] - contain texture file:
- (If EVO1 version): *.ART, *.ACT, *.OPA.
- (if EVO2 version): *.TIF, *_Bump.TIF
- [MODELS] - contain 3D model's meshes: *.SMF
- [TRUCK] - configuration/setup file: *.TRK
- [ART] - contain texture file:
- Unzip your download custom parts and put them in the car/truck's [ART] and [MODELS] file folder. Make sure you put them according to their proper file extension eg: *.SMF should be in [MODELS].
- **Note: If *.TGA or *.BMP texture file included along with your custom parts package put them in the [MODELS] folder so that it can be linked directly into Z-Modeler program. Make sure your image format uses 16M color so that it can be displayed on Z-Modeler screen.
Ok lets get started.
- Run your Z-Modeler 3D program, then open your favorite car/truck that you want to edit and add-in those custom parts in. Click the menu bar or your Z-Modeler: [FILE] >> [IMPORT...] >> ["Select your *.SMF file"] >> ["click Open] >> [" and then select proper EVO version"].
- If you manage to import successfully you'll able to see the car/truck model on your Z-Modeler workspace.
- Now you'll need to import your custom parts into your Z-Modeler, follow the same import procedure as shown in step (1).
- If you made a successful import, the parts will be shown on your workspace, [as shown below]
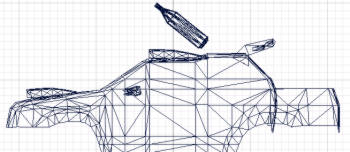
Imported parts in to Z-Modeler will appear in random places inside the workspace, depends on how the part originally placed previously by the author/designer of custom parts . eg: Custom parts (NOS cylinders) appear above the truck body once imported on the screen. - Move your parts to desired location where you want it, select/highlight the parts object then drag it to a new location. To make sure you're able to drag the parts freely on all horizontal and vertical axis make sure you enable few object selection and moving function by clicking these button on your toolbars. [as shown below]
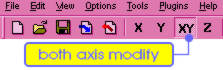
In Z-Modeler toolbar click the [XY] icon as shown above to enable you to move an object using mouse device in both "X: and "Y" axis movement. 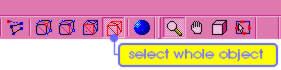
Enable the "Select Object" icon enable you to select an object. 
Click the masked rectangle ion to enable you to select/highlight the object you want to edit or move. 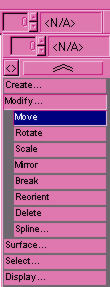
<< on your right side of your Z-Modeler vertical toolbar click [MODIFY...] >> [MOVE] to enable you to move an object. 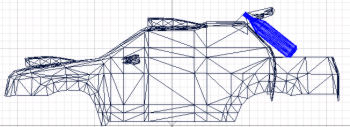
If you successfully followed the instruction from step (5) you will able to move an object from one location to another as shown in the image above. eg: The highlighted custom parts is moved to the back of the truck. - If you're done putting the parts on the proper location, rename the parts so that it can be use/visible in the game for example: "glassE" or "BoDY" and other valid naming. (please click here to view for valid parts naming). Try to avoid assigning names that have been used by other parts/object. If another object already use "Body" as their name, then you'll need to rename your parts as "BODY" or "boDY" using different caps style to avoid object conflict. [as shown below]
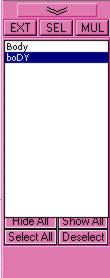
<< The "OBJECT" toolbar located on your right bottom corner of your Z-Modeler; display list object/parts available on the screen. You can rename your parts with the existing name used by other object but must use different caps style to differentiate with others. For example: - Body - your car/truck models name
- boDY - your parts models name
- Done? Ok you need to proceed to the hardest task; "Texture Mapping". By default you'll notice that your custom parts doesn't have texture on its surface. Your car/truck base model however display texture because its already mapped. So your parts need to be mapped with texture else it doesn't show properly in games. Most downloaded custom parts supplied with its own texture file usually in "*.TGA" format so that it can be displayed on your Z-Modeler. To make texture visible in games it'll need to be converted into "*.RAW" and "*.ACT" format, well discuss about the converting texture thing later on.
- If you look back in your "MODEL" folder (where you put your *.SMF models and texture *.TGA file) you'll notice that you have multiples set of texture. One set for car/truck texture and other one is your parts texture. But the game only read the texture as one single texture file. So you'll need to merge two texture as one. Use the car/truck texture as base/main texture, cut the parts texture an paste it into your car/truck main texture.
- Done? Now you are ready to map, click here for TEXTURE MAPPING tutorial. Follow the instruction, if you're done, click "BACK" on your web browser to get back to this page and then you can proceed to next step (10).
- If everything works fine and your car/truck and parts can display proper texture then you've completed your task. Finish? Then save/import your work by click [FILE] >> [EXPORT...] >> [" Overwrite *.SMF file"] >> ["click Save] >> [" and then select proper EVO version"].
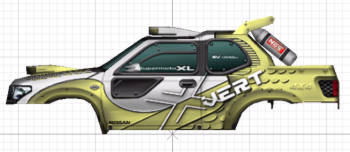
If you've successfully follow the "TEXTURE MAPPING" instruction, the parts will be textured as shown in the image above. - Go to your [MODELS] folder and convert your car/truck image/texture format from *.TGA (16M color) to *.BMP (256K color). Save and put it under [ART] folder. Then in your [ART] folder, select the same *.BMP file you've edit previously and convert it from *.BMP to *.RAW format using "FLYRAWGUI.exe". If successful you'll get two type of file from the same texture *.RAW and *.ACT.
- Ok so? finish you say?..., not yet! You've just complete making one of the two set required for making a complete models of car/truck. What? one out of two?..yes! The current set you're working on is for "High detail models" but now you're going to make another set of low detail models. Don't worry it should be simple for you to do it, just click and read the extended "LOW DETAIL MODELS" tutorial right here. If you're done then you can proceed to step (13).
- POD your car/truck's all three folder [ACT], [MODELS] and [TRUCK] back into original *.POD file so that it an be use in the game. Done? Congratulation!! Enjoy your newly modify vehicle.
**Ambiguous/ surplus files: If you've manage to save your *.SMF file you'll notice that there's an extra file create by Z-Modeler known as *.BAK. These file are copies of your original *.SMF file that serve as backups. If you've wrongly edit your current *.SMF file or just gone corrupted or want to undo back your *.SMF, you can restore by rename copies of *.BAK file to *.SMF. So you get back your original un-edited models.
Good Luck!